Valves are the key components in nearly all industrial processes. They regulate flow, balance pressure, separate processes, and provide the means to safely manipulate gases and fluids. While general-purpose applications are handled by standard valves, they usually fall short in situations where special installation needs, extreme working conditions, or highly specialized applications exist.
If you are a project engineer, procurement officer, or plant manager who has to procure specially ordered valves straight from a manufacturer, this guide will walk you through every step, from defining your requirements to ensuring receipt. Unlike general purchasing or troubleshooting guides, this article takes into consideration specifically ordering valves from manufacturers to have valves to your exact specifications.
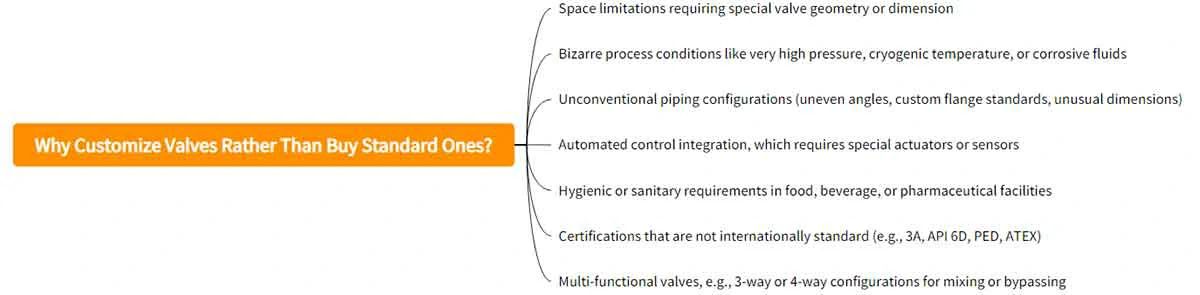
1. Why Customize Valves Rather Than Buy Standard Ones?
Stock valves are designed for typical applications, but they generally cannot accommodate specific challenges. The following are common reasons to request a custom solution:
- Space limitations requiring special valve geometry or dimension
- Bizarre process conditions like very high pressure, cryogenic temperature, or corrosive fluids
- Unconventional piping configurations (uneven angles, custom flange standards, unusual dimensions)
- Automated control integration, which requires special actuators or sensors
- Hygienic or sanitary requirements in food, beverage, or pharmaceutical facilities
- Certifications that are not internationally standard (e.g., 3A, API 6D, PED, ATEX)
- Multi-functional valves, e.g., 3-way or 4-way configurations for mixing or bypassing
Specialty valves help bring your device into compliance with system design requirements, regulatory specifications, and future maintenance considerations.
2. Know Your Application Before Approaching a Manufacturer
Prior to calling a valve manufacturer, have well-defined technical and operating requirements. The greater the detail, the faster and more accurately a manufacturer can respond.
1) Define the Application Parameters
Start with the basics:
- Media Type: What fluid, gas, or slurry will the valve handle? Define viscosity, toxicity, and abrasiveness.
- Temperature Range: Operating and maximum temperatures.
- Flow Rate or Cv: Input the desired flow rate or flow coefficient to ensure accuracy in control.
- Function: Shut-off, throttling, backflow prevention, or directional control?
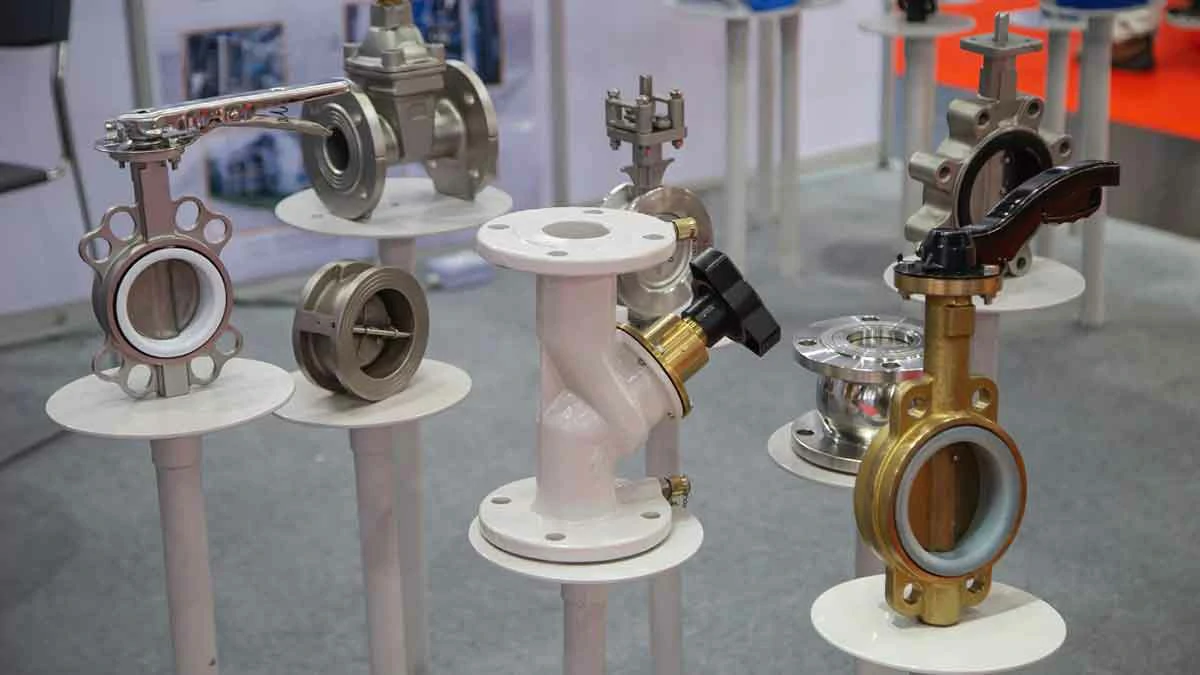
2) Choose Valve Type
Determine what valve type best fits your process:
- Ball valve for on/off and quick shutoff
- Gate valve for low-pressure drop full flow
- Butterfly valve for big diameter flow control
- Globe valve for precise flow regulation
- Diaphragm valve for sanitary or slurry service
- Check valve for avoiding reverse flow
- Needle valve for accurate metering
If unsure, discuss your application with the manufacturer—there might be a suggested arrangement.
3) Select Materials
Your conditions of operation and media will determine materials that are strong and safe.
Body materials may be:
- Stainless steel (304, 316, duplex)
- Brass or bronze
- Cast iron or ductile iron
- Carbon steel
- PVC, CPVC, PTFE-lined bodies
Seat and seal materials may be:
- PTFE (Teflon)
- EPDM
- FKM (Viton)
- NBR (nitrile)
- Graphite
- PEEK
Supply a list of media and cleaning chemicals to avoid compatibility issues.
3. Prepare a Well-Organized and Complete RFQ (Request for Quotation)
After setting your specs, organize your RFQ for better clarity. An organized request projects professionalism and enhances supplier response time.
What to Include:
- Type of valve and its function
- Nominal size and pressure rating
- Range of media, temperature, and pressure
- Materials required (body and internals)
- Type of connection (flanged, threaded, welded, sanitary clamp, etc.)
- Actuation (manual, electric, pneumatic, spring return, fail-safe)
- Quantity and delivery schedule
- Compliance or certification requirements (e.g., CE, ISO, 3A, FDA, API, ATEX)
- Installation pictures or drawings (particularly retrofits)
If possible, provide 3D CAD files or P&ID diagrams to explain where the valve fits within the system.

4. Assess Customization Possibilities with the Manufacturer
Now that the inquiry has been made, the manufacturer will start suggesting solutions. This is your opportunity to work together to tweak the design.
1) Typical Customization Parameters
- Face-to-face sizes: Adjust length or height for a close-fitting envelope
- Multi-port designs: For 3-way or 4-way fluid diversion
- Handle direction or short-acting actuator: For close-fitting installation envelopes
- Pressure class improvements: Thin walls or forged bodies
- Hygienic design elements: Polished finish interiors, CIP/SIP compatibility, elastomer-free design
- Insulating or jacketed valves: For steam-traced or cryogenic service
- Position sensors or limit switches: For automation and feedback
- Color-coded handles or tags: For plant-wide visual management
2) Detail Cost and Lead Time Considerations
Special valves typically involve:
- Cost of mold or tooling (especially where the bodies are to be cast)
- Higher lead time (typically 6–12 weeks)
- Higher MOQ if special products are involved
- Design engineering fees for radical changes
Be transparent about your project timeline and budget so the manufacturer can provide feasible solutions.
5. Review Design Drawings and Approve Samples
Once the supplier has devised a proposed solution, they will provide:
- 2D technical drawings
- 3D system layout integration models
- Material data sheets
- Flow simulation reports (where required)
First Article or Prototype Approval
For high-volume orders or complicated orders, you may request a “first article” valve or prototype valve for test purposes. Check for:
- Dimensional accuracy
- Functional functionality
- Installation ease
- Material identification and traceability
Provide clear feedback in case of need for adjustments before mass production.
6. Familiarize Yourself with Testing, Quality Control, and Certification
A commercial valve manufacturer will conduct quality control tests on every batch—and especially on special valves.
Typical Tests Include:
- Hydrostatic shell test
- Seat leakage test (to API 598 or ISO 5208)
- Pneumatic test
- Torque test for actuators
- Fire-safe or fugitive emission testing (optional)
Certifications Can Include:
- CE or PED (EU pressure equipment codes)
- ISO 9001 (quality management)
- FDA or 3A for food-grade valves
- API 6D / API 607 for oil and gas
- ATEX or IECEx for explosion-proof actuated valves
Order material test report (MTR) and certificate of conformity per shipment if required.
7. Shipping, Installation, and After-Sales Service Planning
Logistics and after-sales service are as important as the design.
1) Delivery and Packaging
- Check shipping terms: EXW, FOB, CIF, or DDP
- Ask about export packaging (wooden crates, desiccants, vacuum packing)
- Label valves with item codes and flow direction
- Inspect customs forms (commercial invoice, packing slip, HS code, certificate of origin)
2) Installation and Training
- Order operation manuals, wiring diagrams, and actuator programming guides
- Inspect for the use of special tools for installation or calibration
- Order on-site or remote technical support if required
3) Spare Parts and Maintenance
- Request a list of spare parts and reorder part numbers
- Order seal kits, actuators, and replacement seats
- Inspect for support availability over the valve’s intended life span (typically 5–10 years)
8. Conclusion
Buying a custom valve is not a single, standalone sale—it is a technical cooperation among your people and the supplier. The more specific you are in describing your system’s needs, the better the supplier will be able to design a solution that functions well, safely, and economically.
No matter whether you are building a clean-in-place dairy line or a high-pressure chemical injection skid, following a sequential process—RFQ through test to installation—will deliver you the valve you need, and no more.